티스토리 뷰

타임 리프 (Thymeleaf)
- 백엔드 서버에서 HTML을 동적으로 렌더링하는 용도로 사용된다.
즉, SSR(Server Side Rendering) 을 한다. - 순수 HTML을 그대로 태그사용, 유지하면서 뷰 템플릿도 사용할 수 있는 것을 네츄럴 템플릿 (natural template)라고한다.
즉, 타임리프는 네츄럴 템플릿이다. - 스프링의 다양한 기능을 편리하게 지원해준다.
백엔드 개발자 라면 무조건 알아야하는 템플릿 중 하나입니다.
SSR에는 JSP, 타임리프 등이 있지만 지금으로써는 타임리프만 알아도 되기 때문에 타임리프를 공부할 것이고
깊게 하는 것이 아닌 이런게 있구나 정도고 필요할 때 찾으면 되는 정도로 작성하게 되었습니다.
공식 문서
지금 현재 버전은 3.1 버전이며 현재 버전과 최신버전에 차이가 있을 수 있습니다.
공식 사이트: https://www.thymeleaf.org/
Thymeleaf
Integrations galore Eclipse, IntelliJ IDEA, Spring, Play, even the up-and-coming Model-View-Controller API for Java EE 8. Write Thymeleaf in your favourite tools, using your favourite web-development framework. Check out our Ecosystem to see more integrati
www.thymeleaf.org
공식 메뉴얼 - 기본 기능: https://www.thymeleaf.org/doc/tutorials/3.1/usingthymeleaf.html
Tutorial: Using Thymeleaf
1 Introducing Thymeleaf 1.1 What is Thymeleaf? Thymeleaf is a modern server-side Java template engine for both web and standalone environments, capable of processing HTML, XML, JavaScript, CSS and even plain text. The main goal of Thymeleaf is to provide a
www.thymeleaf.org
목록
- 텍스트 노출
- 객체와 변수 사용
- 유틸리티 날짜
- URL 링크
- 속성값 설정
- 반복
- 조건
- 블록
- 자바스크립트 인라인
- 템플릿 조각으로 사용하기
- 레이아웃
1. 텍스트 노출
아래의 빨간 색상은 뭐가 다른지 알려주기 위함이다.
- th:text 또는 [[...]]
: 태그까지 문자로 포함해서 텍스트 출력 - th:utext 또는 [(...)]
: 태그를 HTML로 인식하게 되고 텍스트 출력
HTML
Controller에서 Model 객체에 model.addAttribute("data", "<b>타임리프 공부중</b>"); 이라고 담았다고 하자.
<h1>text vs utext</h1>
<ul>
  <li>th:text = <span th:text="${data}"></span></li>
  <li>th:utext = <span th:utext="${data}"></span></li>
</ul>
<h1><span th:inline="none">[[...]] vs [(...)]</span></h1>
<ul>
  <li><span th:inline="none">[[...]] = </span>[[${data}]]</li>
  <li><span th:inline="none">[(...)] = </span>[(${data})]</li>
</ul>
2. 객체와 변수 사용
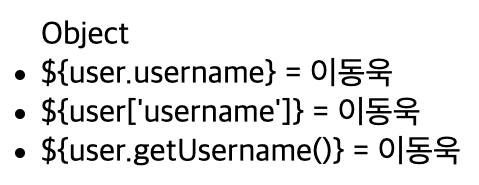
객체 프로퍼티에 접근하는 방법에는 3가지가 있다.
- . 을 이용한 방식
- [' '] 을 이용한 방식
- getter를 이용한 방식
HTML
Controller에서 Model 객체에 model.addAttribute("user", new User("이동욱", 25) ); 이라고 담았다고 하자.
그리고 User 클래스에는 username이라는 필드가 있다고 하자.
<ul>
  Object
  <li>${user.username} = <span th:text="${user.username}"></span></li>
  <li>${user['username']} = <span th:text="${user['username']}"></span></li>
  <li>${user.getUsername()} = <span th:text="${user.getUsername()}"></span></li>
</ul>

3. 유틸리티 날짜
현재 시간에 대한 컨트롤인데 DB에서 특정 날짜 데이터를 가져와서 컨트롤 할 때 필요할 것 같다.
HTML
Controller에서 Model 객체에 model.addAttribute("localDateTime", LocalDateTime.now()); 을 담았다고 하자.
<h1>LocalDateTime</h1>
<ul>
  <li>default = <span th:text="${localDateTime}"></span></li>
  <li>yyyy-MM-dd HH:mm:ss = <span th:text="${#temporals.format(localDateTime, 'yyyy-MM-dd HH:mm:ss')}"></span></li>
</ul>
<h1>LocalDateTime - Utils</h1>
<ul>
  <li>${#temporals.day(localDateTime)} = <span th:text="${#temporals.day(localDateTime)}"></span></li>
  <li>${#temporals.month(localDateTime)} = <span th:text="${#temporals.month(localDateTime)}"></span></li>
  <li>${#temporals.monthName(localDateTime)} = <span th:text="${#temporals.monthName(localDateTime)}"></span></li>
  <li>${#temporals.monthNameShort(localDateTime)} = <span th:text="${#temporals.monthNameShort(localDateTime)}"></span></li>
  <li>${#temporals.year(localDateTime)} = <span th:text="${#temporals.year(localDateTime)}"></span></li>
  <li>${#temporals.dayOfWeek(localDateTime)} = <span th:text="${#temporals.dayOfWeek(localDateTime)}"></span></li>
  <li>${#temporals.dayOfWeekName(localDateTime)} = <span th:text="${#temporals.dayOfWeekName(localDateTime)}"></span></li>
  <li>${#temporals.dayOfWeekNameShort(localDateTime)} = <span th:text="${#temporals.dayOfWeekNameShort(localDateTime)}"></span></li>
  <li>${#temporals.hour(localDateTime)} = <span th:text="${#temporals.hour(localDateTime)}"></span></li>
  <li>${#temporals.minute(localDateTime)} = <span th:text="${#temporals.minute(localDateTime)}"></span></li>
  <li>${#temporals.second(localDateTime)} = <span th:text="${#temporals.second(localDateTime)}"></span></li>
  <li>${#temporals.nanosecond(localDateTime)} = <span th:text="${#temporals.nanosecond(localDateTime)}"></span></li>
</ul>

타임리프 유틸리티 사이트
https://www.thymeleaf.org/doc/tutorials/3.0/usingthymeleaf.html#expression-utility-objects
Tutorial: Using Thymeleaf
1 Introducing Thymeleaf 1.1 What is Thymeleaf? Thymeleaf is a modern server-side Java template engine for both web and standalone environments, capable of processing HTML, XML, JavaScript, CSS and even plain text. The main goal of Thymeleaf is to provide a
www.thymeleaf.org
4. URL 링크
URL을 생성할 때 @{...} 을 사용한다.
- 쿼리 파라미터 th:href="@{/path(param1=${key1}, param2=${key2})}"
: /path?param1=data1¶m2=data2 - 경로 변수 th:href="@{/path/{param1}/{param2} (param1=${key1}, param2=${key1})}"
: /path/data1/data2 - 경로 변수 + 쿼리 파라미터 th:href="@{/path/{param1}(param1=${key1}, param2=${param2})}"
: /path/data1?param2=data2
HTML
Controller에서 Model 객체에 model.addAttribute("key1", "data1"); 와 1을 2로 바꾼 데이터를 총 2개 담았다고 하자.
<ul>
    <li><a th:href="@{/hello(param1=${param1}, param2=${param2})}">hello query param</a></li>
    <li><a th:href="@{/hello/{param1}/{param2}(param1=${param1}, param2=${param2})}">path variable</a></li>
    <li><a th:href="@{/hello/{param1}(param1=${param1}, param2=${param2})}">path variable + query parameter</a></li>
</ul>

5. 속성 값 설정
th:* 속성을 지정하면 타임리프는 기존 속성을 th:*로 지정한 속성으로 대체합니다.
만약 기존 속성이 없다면 th:*으로 인해 새롭게 만들게 됩니다.
- class="text" th:classappend="추가할 클래스이름"
: class="text {추가할 클래스 이름}" 이런식으로 노출되게 된다.
즉, class 속성에 자연스럽게 추가한다. - th:attrappend="속성이름='넣을 속성값'"
: 속성 값의 뒤에 값을 추가한다. - th:attrprepend="속성이름='넣을 속성값'"
: 속성 값의 앞에 값을 추가한다.
HTML
<!-- 코드 -->
- th:attrappend = <input type="text" class="text" th:attrappend="class=' large'"/><br/>
- th:attrprepend = <input type="text" class="text" th:attrprepend="class='large '"/><br/>
- th:classappend = <input type="text" class="text" th:classappend="large" /><br/>

<!-- 출력 -->
- th:attrappend = <input type="text" class="text large"/><br/>
- th:attrprepend = <input type="text" class="large text"/><br/>
- th:classappend = <input type="text" class="text large" /><br/>
6. 반복
- th:each="변수, 변수Stat : ${Model에서 컬렉션으로 받은 Key}"
: 오른쪽 컬렉션의 값을 하나씩 변수에 담아서 반복을 실행한다. - 변수Stat에 있는 객체 프로퍼티를 꺼내서 사용할 수 있는 값
index - 0부터 시작하는 값
count - 1부터 시작하는 값
size - 전체 사이즈
even, odd - 홀수, 짝수 여부 (boolean)
first, last - 처음, 마지막 여부 (boolean)
current - 현재 객체
HTML
Controller에서 Model 객체에 model.addAttribute("users", new List<User> ); 담았다고 하자.
<table border="1">
  <tr>
    <th>count</th>
    <th>username</th>
    <th>age</th>
    <th>etc</th>
  </tr>
  <tr th:each="user, userStat : ${users}">
    <td th:text="${userStat.count}">count</td>
    <td th:text="${user.username}">username</td>
    <td th:text="${user.age}">0</td>
    <td>
      index = <span th:text="${userStat.index}"></span>
      count = <span th:text="${userStat.count}"></span>
      size = <span th:text="${userStat.size}"></span>
      even? = <span th:text="${userStat.even}"></span>
      odd? = <span th:text="${userStat.odd}"></span>
      first? = <span th:text="${userStat.first}"></span>
      last? = <span th:text="${userStat.last}"></span>
      current = <span th:text="${userStat.current}"></span>
    </td>
  </tr>
</table>

7. 조건
타임리프의 조건식 if, unless(if의 반대)
- th:text="'성인'" th:if="${user.age lt 20}"
: 20살 보다 이상인 유저는 성인으로 출력하게 한다.
HTML
Controller에서 Model 객체에 model.addAttribute("user", new User("정승필", 25 ); 담았다고 하자.
<!-- 코드 -->
<span th:text="'성인'" th:if="${user.age gt 20}"></span>

<!-- 출력 -->
성인
Tip) 자주 쓰이는 비교연산 !! gt : > , lt : < , ge : >= , le : <=
8. 블록
영역을 구별하고 싶을 때 사용한다.
그럼 이 영역을 구별했을 때 반복문을 돌리거나 조건문을 사용하여 블록을 나누고 사용할 수 있다.
- th:block
: HTML 태그에 타임리프를 걸지 않고 사용할 수 있다.
꼭 HTML 태그 없이 사용 안해도 되고 태그 안에 넣어서 사용해도 된다.
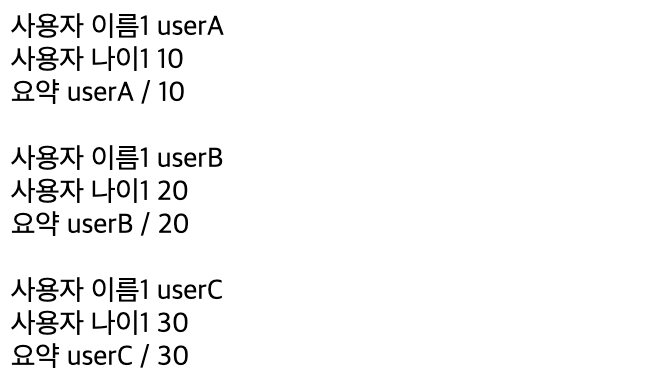
HTML
Controller에서 Model 객체에 model.addAttribute("users", new List<User>); 이라고 담았다고 하자.
<th:block th:each="user : ${users}">
  <div>
    사용자 이름1 <span th:text="${user.username}"></span><br>
    사용자 나이1 <span th:text="${user.age}"></span> </div>
  <div>
    요약 <span th:text="|${user.username} / ${user.age}|"></span>
  </div>
  <br>
</th:block>
9. 자바스크립트 인라인
- <script th:inline="javascript">
: 스트립트에 타임리프 인라인으로 설정해주면 자동적으로 타임리프가 쓰기 편하게 해준다. - [[${...}]]
: 맨 처음 배운 텍스트 출력을 스크립트에 사용한 것이다. 자동으로 ' ' 을 붙혀줘서 문자열로 출력된다. - /*[[${...}]]*/ "text"
: 안에 있는 값이 존재하면 값대로 나오고 없으면 text로 출력된다. - [# th:each="user, stat : ${users}"] ~~ [/]
: 자바스크립트에서 반복문 돌릴 떄 사용한다.
HTML
Controller에서 Model 객체에 model.addAttribute("user", new User("정승필", 10 ); 담았다고 하자.
<!-- 자바스크립트 인라인 사용 후 -->
<script th:inline="javascript">
  let username = [[${user.username}]];
  let age = [[${user.age}]];

  let username2 = /*[[${user.username}]]*/ "test username";

  let user = [[${user}]];

  [# th:each="user, stat : ${users}"]
      let user[[${stat.count}]] = [[${user}]];
  [/]
</script>

<!-- 이후 개발자 도구를 열고 console.log를 찍어주면 된다. -->
console.log(username);  -> 정승필
console.log(username2);  -> 정승필
console.log(age);      -> 10
console.log(user1);    -> {username: '정승필', age: 10}
10. 템플릿 조각으로 사용하기
웹페이지를 개발 할 때 공통 영역이 많이 있을 것이다.
예를 들어, 상단 영역, 하단 영역, 사이드 바 등 여러 페이지에서 공통으로 사용하는 영역들이 있다.
이러한 코드들을 하나하나 입력한다면 아주 불필요하고 하나 변경할 때 전체 페이지를 바꿔야하니까 비효율적이다.
그래서 이것을 사용할 수 있는 템플릿 조각을 알아보도록 하겠습니다.
- th:fragment
: 템플릿 조각을 명시한다. - th:insert
: 현재 태그 <div> 내부에 HTML 요소를 추가하게 된다. - th:replace
: 현재 태그 <div>를 대체한다. - th:replace (파라미터)
: 현재 태그 <div>를 대체하고 th:fragment 에 파라미터를 보낼 수 있다.
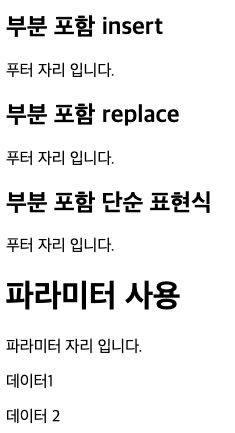
fragmentMain.html : 메인 html
<h2>부분 포함 insert</h2>
<div th:insert="~{template/fragment/footer :: copy}"></div>

<h2>부분 포함 replace</h2>
<div th:replace="~{template/fragment/footer :: copy}"></div>

<h2>부분 포함 단순 표현식</h2>
<div th:replace="template/fragment/footer :: copy"></div>

<h1>파라미터 사용</h1>
<div th:replace="~{template/fragment/footer :: copyParam ('데이터1', '데이터 2')}"></div>
template/fragment/footer.html : 조각 html
<footer th:fragment="copy">
  푸터 자리 입니다.
</footer>

<footer th:fragment="copyParam (param1, param2)">
  <p>파라미터 자리 입니다.</p>
  <p th:text="${param1}"></p>
  <p th:text="${param2}"></p>
</footer>
결과 html
<h2>부분 포함 insert</h2>
<div><footer>
  푸터 자리 입니다.
</footer></div>

<h2>부분 포함 replace</h2>
<footer>
  푸터 자리 입니다.
</footer>

<h2>부분 포함 단순 표현식</h2>
<footer>
  푸터 자리 입니다.
</footer>

<h1>파라미터 사용</h1>
<footer>
  <p>파라미터 자리 입니다.</p>
  <p>데이터1</p>
  <p>데이터 2</p>
</footer>
11. 레이아웃
먼저 설명을 주면 메인 html에 있는 값들을 fragment에 보내줘서 HTML에 출력하는 형태인 것같다.
그래서 CSS, JS 경로 뿐만 아니라 HTML 자체로도 줄 수 있는 것을 확인 할 수 있다.
그래서 순서 대로 따라가보자
- Main.html에서 template/layout 경로에 있는 th:fragment="layout" 명을 가진 것으로 대체한다고 한다.
- title, link, section 들을 파라미터로 줄 것이고 값은 아래와 같이 넘겨준다.
title : 메인 페이지 타이틀, link : css 경로 2개, section : section 태그 안에 있는 HTML - layout.html은 데이터를 받아서 값들을 채워 넣는다.
- 사용자에게 해당 HTML로 렌더링한 것이 보이게 된다.
Main.html
<!DOCTYPE html>
<html th:replace="~{template/layout :: layout(~{::title}, ~{::link}, ~{::section})}" xmlns:th="http://www.thymeleaf.org">
<head>
  <link rel="stylesheet" th:href="@{/css/bootstrap.min.css}">
  <link rel="stylesheet" th:href="@{/themes/smoothness/jquery-ui.css}">
  <title>메인 페이지 타이틀</title>
</head>
<body>
<section>
  <p>
    메인 페이지 컨텐츠
  </p>
  <div>
    메인 페이지 포함 내용
  </div>
</section>
</body>
</html>
layout.html
<!DOCTYPE html>
<html th:fragment="layout (title, links, content)" xmlns:th="http://www.thymeleaf.org">
<head>
  <title th:replace="${title}">레이아웃 타이틀</title> </head>
  <!-- 공통 -->
  <link rel="stylesheet" type="text/css" media="all" th:href="@{/css/awesomeapp.css}">
  <link rel="shortcut icon" th:href="@{/images/favicon.ico}">
  <script type="text/javascript" th:src="@{/sh/scripts/codebase.js}"></script>
  <!-- 추가 -->
  <th:block th:replace="${links}" />
<body>
<h1>레이아웃 H1</h1>
<div th:replace="${content}">
  <p>레이아웃 컨텐츠</p>
</div>
<footer>
  레이아웃 푸터
</footer>
</body>
</html>


감사합니다.
'프론트엔드' 카테고리의 다른 글
| [Front] JS heap, Listener, Node를 신경 쓴 메모리 누수 이야기 (0) | 2024.04.30 |
|---|---|
| [Front] SSR vs CSR : 웹 애플리케이션 렌더링 방식 비교 (0) | 2024.01.25 |
| [Front] HTML 요소에 data 속성 사용하기 : 더 깔끔하게 (0) | 2024.01.02 |
| [Front] 이벤트 (Event)의 모든 것 : 이벤트 핸들링과 상호작용 (0) | 2023.12.13 |
| [Fornt] 선택자와 요소 : 기본적인 이해 (0) | 2023.11.24 |
- Total
- Today
- Yesterday
- 디자인패턴
- Front
- 멀티모듈
- JPA 페이징
- 프로세스
- 코딩테스트
- 데이터 베이스
- 소셜로그인
- aws
- 개발환경
- JavaScript
- 개발
- 트랜잭션
- 개발블로그
- 깃허브 액션
- 알고리즘
- Spring Security
- Flutter
- java
- 그리디
- 네트워크
- 계단 오르기
- Fetch
- 개발자
- spring
- 실시간 채팅
- 카카오 로그인
- 시간 객체
- DBeaver
- BFS
| 일 | 월 | 화 | 수 | 목 | 금 | 토 |
|---|---|---|---|---|---|---|
| 1 | 2 | 3 | ||||
| 4 | 5 | 6 | 7 | 8 | 9 | 10 |
| 11 | 12 | 13 | 14 | 15 | 16 | 17 |
| 18 | 19 | 20 | 21 | 22 | 23 | 24 |
| 25 | 26 | 27 | 28 | 29 | 30 | 31 |
