티스토리 뷰

들어가기 전 설명
현재 구현한 코드들은 GitHub 에 있습니다. 글을 보다가 헷갈리시면 소스코드로 참고해주시기 바랍니다.
개발 환경
JAVA17
Spring Boot 3.1.8
Spring Security 6.1.6
Spring JPA 3.1.8
Mac OS
JAVA JWT 4.4.0
IntelliJ 2024.01.04v
작업 순서와 프로젝트 구조
작업 순서
- Security Config 설정
- DB 연결
- Entity와 Model
- 회원가입 비즈니스 로직
- 예외처리
- 결과
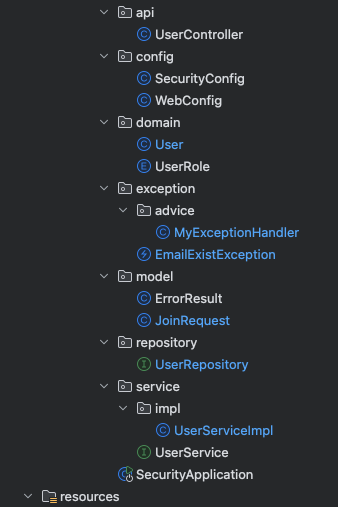
프로젝트 구조

security
│
├── api
│   └── UserController
│
├── config
│   ├── SecurityConfig
│   └── WebConfig
│
├── domain
│   ├── User
│   └── UserRole
│
├── exception
│   ├── advice
│   │   └── MyExceptionHandler
│   └── EmailExistException
│
├── model
│   ├── ErrorResult
│   └── JoinRequest
│
├── repository
│   └── UserRepository
│
├── service
│   ├── impl
│   │   └── UserServiceImpl
│   └── UserService
│
└── SecurityApplication
1. Security Config 설정
람다 형식의 표현이 Spring Boot 3.1.x 버전(Spring 6.1.x) 이상부터 표현이 필수가 되었으며 아래의 공식 문서를 보고 작성하실 수 있습니다.
https://docs.spring.io/spring-security/reference/servlet/authentication/passwords/index.html
Username/Password Authentication :: Spring Security
Normally, Spring Security builds an AuthenticationManager internally composed of a DaoAuthenticationProvider for username/password authentication. In certain cases, it may still be desired to customize the instance of AuthenticationManager used by Spring S
docs.spring.io
SecurityConfig
- CSRF 비활성화
: Cross-Site Request Forgery 라고하며, 일반적으로 RESTful API에서는 CSRF 보호가 필요하지 않기 때문에 비활성화하였습니다. - 폼 로그인 방식 비활성화
: RESTful API 방식으로 할 것이며 JWT를 이용할 것이기에 폼 로그인 방식을 비활성화하였습니다. - HTTP Basic 인증 방식 비활성화
: 보안이 약한 방식이므로 대부분 사용하지 않습니다. - 요청 인증 및 권한 설정
: 모두 접근할 수 있는 URL과 일부 URL 요청에 따라 권한을 설정해주었습니다. - 세션 관리 설정
: JWT 기반 인증을 사용할 것이기 때문에 세션을 사용하지 않도록 설정해주었습니다.
@Configuration
@EnableWebSecurity
public class SecurityConfig {

    @Bean
    public BCryptPasswordEncoder bCryptPasswordEncoder(){
        return new BCryptPasswordEncoder();
    }

    @Bean
    public SecurityFilterChain filterChain(HttpSecurity http) throws Exception{

        final String[] ALL_URL = new String[]{"/api/user/login", "/api/user/save"};
        final String[] ADMIN_URL = new String[]{"/api/admin"};
        final String[] ROLES = new String[]{UserRole.SUPER.getCode(), UserRole.MANAGER.getCode(), UserRole.ADMIN.getCode()};


        // csrf disable
        http
                .csrf((auth) -> auth.disable());

        // From 로그인 방식 disable
        http
                .formLogin((auth) -> auth.disable());

        // http basic 인증 방식 disable
        http
                .authorizeHttpRequests((auth) -> auth
                        .requestMatchers(ALL_URL).permitAll()
                        .requestMatchers(ADMIN_URL).hasAnyRole(ROLES)
                        .anyRequest().authenticated());

        // 세션 설정
        http
                .sessionManagement((session) -> session.sessionCreationPolicy(SessionCreationPolicy.STATELESS));

        return http.build();
    }
}
2. DB연결
아래에 보이는 이전글을 읽어보시면 바로 연결하실 수 있으실 겁니다.
String Boot3과 Docker로 띄운 PostgreSQL16 연결하기
[개발환경] String Boot3과 Docker로 띄운 PostgreSQL16 연결하기
개발 환경 Spring Boot 3.1.8JAVA 17PostgreSQL 16.1Docker 24.0.7 사전 준비 도커로 PostgreSQL 서버를 띄우고 동작해야지 Spring과 PostgreSQL을 연동할 수 있습니다.이전 글인 [개발환경] MacOS 도커로 PostgreS
coasis.tistory.com
이렇게만 주면 되게 정 없고 빠르게 못 할 수 있으니 아래에 바로 보시면 됩니다~
시간이 되시면 읽어서 설정해보시는 것도 나쁘지 않습니다.

datasource를 스프링에 등록하면 이제 자동으로 Connection를 맺어줄 것이며,
JPA를 이용해 줄 것이기 때문에 ddl-auto 옵션에 create를 주어 우선 항상 서버를 킬 때 마다 테이블을 지우고 생성하여 데이터를 지워 준채 시작하겠습니다.
application.yml
# ===============================
# Server Property
# ===============================
spring:
  datasource:
    url: "jdbc:postgresql://localhost:5432/postgres?currentSchema=spring"
    username: "postgres"
    password: "0000"
    driver-class-name: org.postgresql.Driver
  jpa:
    show-sql: true
    database: postgresql
    hibernate:
      ddl-auto: create
    properties:
      hibernate:
        default_schema: spring
3. Entity와 Model
엔티티와 DTO 객체는 글을 빨리 보시기 위해 더보기 처리하였고, 필요하시면 더보기로 자세하게 코드를 보시면 됩니다.
User (엔티티)
@Getter
@Builder
@Entity
@NoArgsConstructor
@AllArgsConstructor
@Table(name = "USER_INFO")
public class User {

    @Id
    @GeneratedValue(strategy = GenerationType.IDENTITY)
    private Long id;

    private String name;
    private String password;

    @Enumerated(EnumType.STRING)
    private UserRole role;
}
UserRole (Enum)
@Getter
public enum UserRole implements GrantedAuthority {
    SUPER("SUPER", "최고관리자")
    , MANAGER("MANAGER", "매니저")
    , ADMIN("ADMIN", "관리자")
    , USER("USER", "일반유저");


    private String code;
    private String value;

    UserRole(String code, String value) {
        this.code = code;
        this.value = value;
    }

    @Override
    public String getAuthority() {
        return this.getCode();
    }
}
JoinRequest (회원 가입 DTO)
@Getter
@Setter
@ToString
public class JoinRequest {

    private String name;
    private String password;

    public User toUserEntity(JoinRequest joinRequest){
        return User.builder()
                .name(joinRequest.getName())
                .password(joinRequest.getPassword())
                .role(UserRole.ADMIN)
                .build();
    }
}
4. 회원가입 비즈니스 로직
UserController
- ServletUriComponentsBuilder.fromCurrentContextPath() 를 이용하여 현재 요청의 컨텍스트 경로를 가져왔습니다.
- 새로 저장된 User 엔티티의 ID값을 path("/api/user/" + newUser.getId())로 만들어 주어 Location에 담아 새 리소스의 URI를 클라이언트에게 알려주었습니다.
- 사용자를 생성했기 때문에 상태코드 Created(201)를 내려주었습니다.
당연히 이렇게 유저정보에 접근 가능하면 보안에 치명적이므로 이후에 보완하는 방법을 알려드리겠습니다.
@Slf4j
@RestController
@RequiredArgsConstructor
@RequestMapping("/api")
public class UserController {

    private final UserService userService;

    // 회원 가입
    @PostMapping("/user/save")
    public ResponseEntity<User> saveUser(@RequestBody JoinRequest joinRequest) {
        User newUser = userService.saveUser(joinRequest);
        URI uri = URI.create(ServletUriComponentsBuilder
                .fromCurrentContextPath().path("/api/user/" + newUser.getId()).toUriString());
        return ResponseEntity.created(uri).body(newUser);
    }

}
UserService
public interface UserService {
    User saveUser(JoinRequest joinRequest);
}
UserServiceImpl
- 회원이 이미 DB에 있는지 확인하고, 이미 있는 email이면 예외를 던집니다.
- 회원이 없으면 이제 비밀번호를 암호화하여 DB에 저장할 수 있도록 Entity로 변환 후 save 합니다.
@Slf4j
@Service
@Transactional
@RequiredArgsConstructor
public class UserServiceImpl implements UserService {

    private final UserRepository userRepository;
    private final BCryptPasswordEncoder bCryptPasswordEncoder;

    // 회원 가입
    @Override
    public User saveUser(JoinRequest joinRequest) {

        String email = joinRequest.getEmail();
        Boolean isExist = userRepository.existsByEmail(email);
        if(isExist) throw new EmailExistException(email);

        String encPassword = bCryptPasswordEncoder.encode(joinRequest.getPassword());
        joinRequest.setPassword(encPassword);
        User user = joinRequest.toUserEntity(joinRequest);

        return userRepository.save(user);
    }
}
UserRepository
@Repository
public interface UserRepository extends JpaRepository<User, Long> {
    Boolean existsByEmail(String email);
}
5. 예외처리
ErrorResult
@Getter
@Setter
@AllArgsConstructor
public class ErrorResult {
    private Integer code;
    private String message;
    private Map<String, Object> data;

    public ErrorResult(Integer code, String message) {
        this.code = code;
        this.message = message;
    }
}
EmailExistException
public class EmailExistException extends RuntimeException{
    private static final String PREFIX_MESSAGE = "This email already exists: ";

    public EmailExistException(String email) {
        super(PREFIX_MESSAGE + email);
    }
}
MyExceptionHandler
- 이메일이 중복이면 상태코드 409 Conflict가 나도록 하였습니다.
@Slf4j
@RestControllerAdvice(annotations = RestController.class)
public class MyExceptionHandler {

    @ResponseStatus(HttpStatus.CONFLICT)
    @ExceptionHandler(EmailExistException.class)
    public ErrorResult emailDuplicationExceptionHandler(EmailExistException e){
        log.error("EmailExistException >> ", e.getMessage(), e);
        return new ErrorResult(HttpStatus.CONFLICT .value(), e.getMessage());
    }
}
6. 결과
이제 테스트를 하려는데 설레지 않으신가요...? 에러 없이 성공하여 활짝웃는얼굴이 되었으면 좋겠습니다.

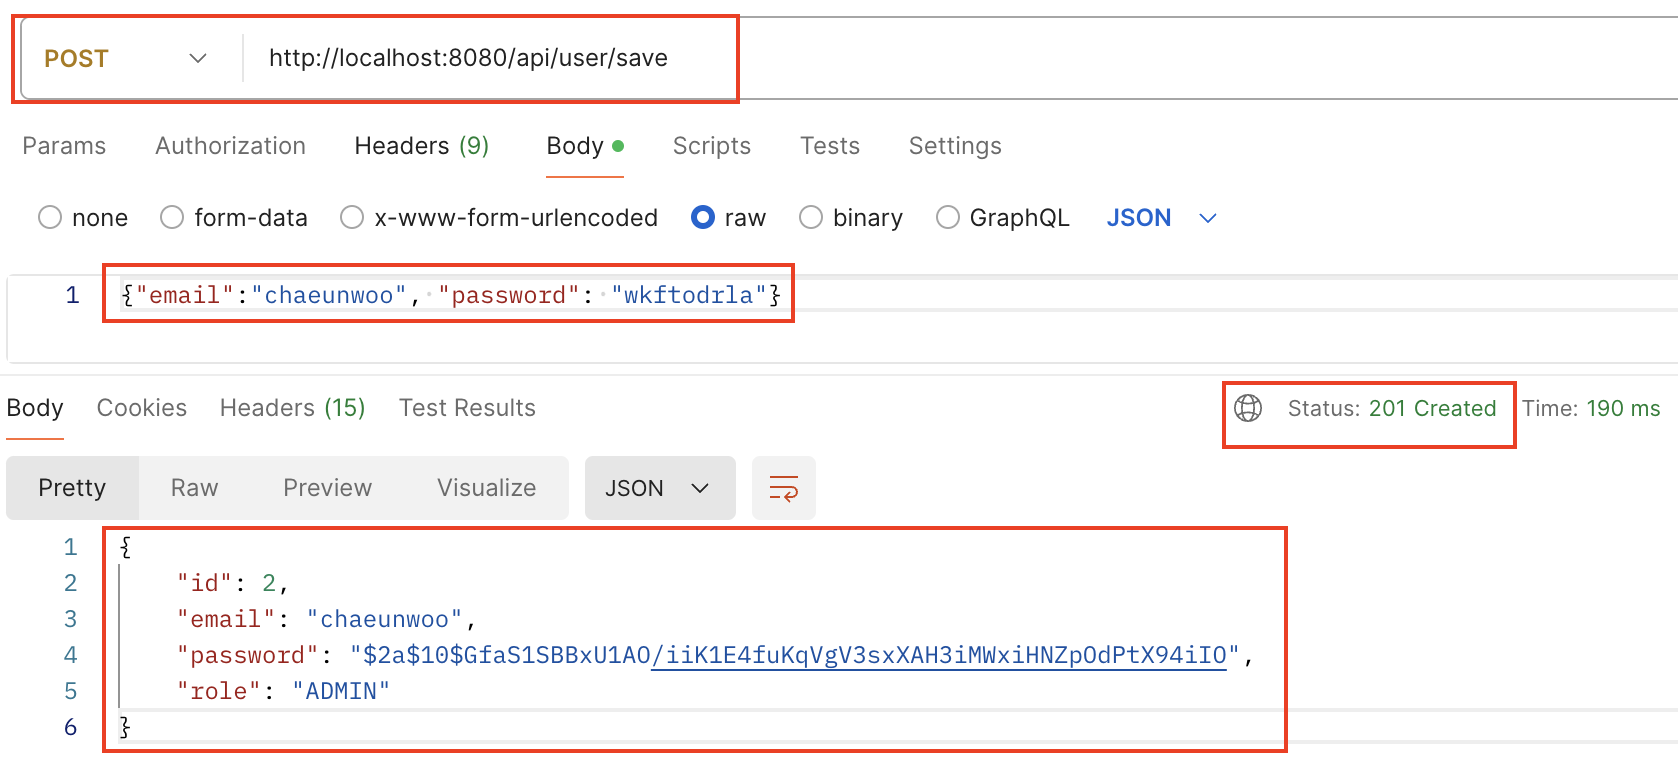
포스트맨으로 테스트
현재는 공부하기 위해 회원가입을 성공했을 때 해당 User Entity를 그냥 내려주고 있습니다.
운영(실무)에서는 ResponseDto를 만들어서 중요한 정보는 무조건!!! 제외를 하고 내려주시기 바랍니다.


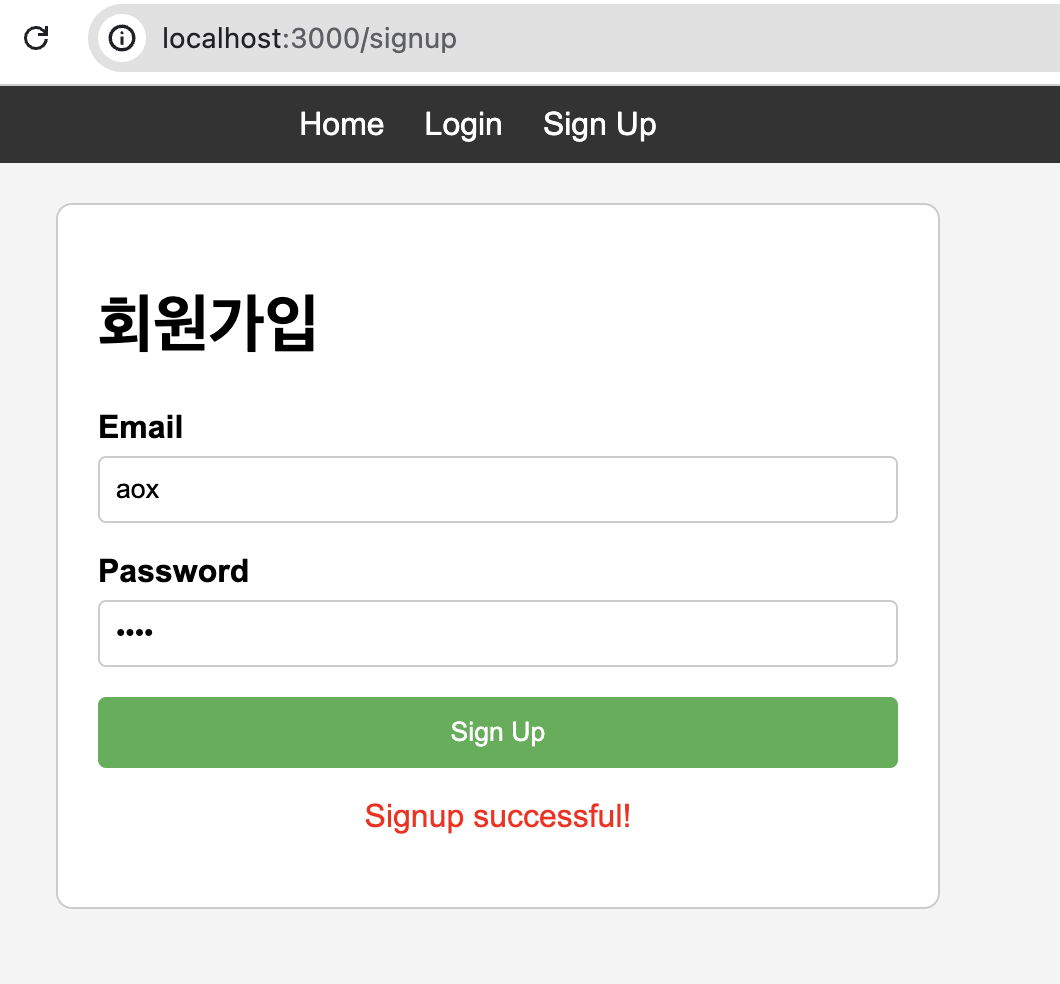
클라이언트 Nuxt로 테스트
이전에 Nuxt로 만든 회원가입 폼으로 아래와 같이 입력하였습니다.
- email : aox
- password : 1234

하지만 한번 Sign Up을 클릭하면 이미 같은 Email이 존재하기 때문에 에러를 보여줍니다.

DB에 안착


감사합니다.
'백엔드 > 🛡️Spring Security' 카테고리의 다른 글
| [Spring Security] 거대해진 URL 기반 인가 관리 노가다 탈출하기 (0) | 2026.01.02 |
|---|---|
| [Spring Security] 스프링 시큐리티 JWT (3/3) : JWT 검증 및 Redis를 활용한 Refresh Token 재발급 (1) | 2024.09.04 |
| [Spring Security] 스프링 시큐리티 JWT (2/3) : 로그인 및 JWT 쿠키로 발급 (0) | 2024.08.16 |
| [Spring Security] 누가 봐도 쉽게 이해하는 구조와 흐름 (0) | 2024.07.29 |
- Total
- Today
- Yesterday
- 프로세스
- 알고리즘
- 개발
- spring
- 소셜로그인
- 디자인패턴
- 코딩테스트
- 카카오 로그인
- JavaScript
- 깃허브 액션
- Front
- 멀티모듈
- java
- 개발블로그
- 계단 오르기
- 개발환경
- 시간 객체
- JPA 페이징
- 트랜잭션
- aws
- 개발자
- DBeaver
- Spring Security
- Fetch
- 데이터 베이스
- 네트워크
- 그리디
- CI/CD
- BFS
- Flutter
| 일 | 월 | 화 | 수 | 목 | 금 | 토 |
|---|---|---|---|---|---|---|
| 1 | 2 | 3 | 4 | 5 | 6 | 7 |
| 8 | 9 | 10 | 11 | 12 | 13 | 14 |
| 15 | 16 | 17 | 18 | 19 | 20 | 21 |
| 22 | 23 | 24 | 25 | 26 | 27 | 28 |

